
In this section, we will discuss a simplified version of Content API’s architecture, what kind of classes exist, the connections between them and what we’ve done in our implementation.
To understand how the different units are implemented both in Content API and in Sprocket engine, and what the connections are between them, we summarized the Content API drawing mechanism in this figure: Content API drawing
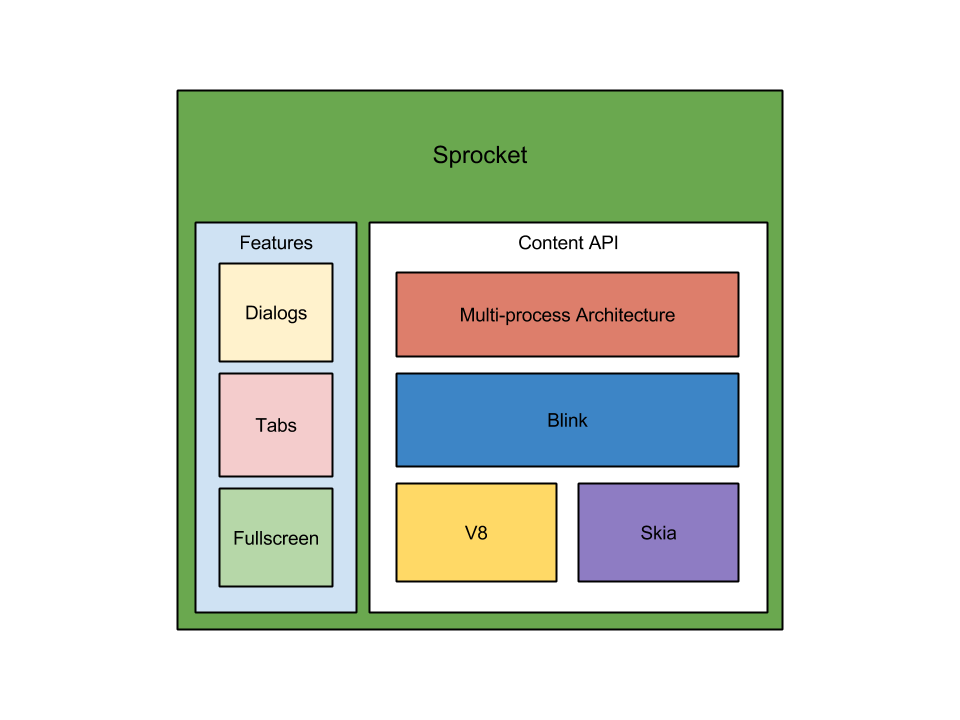
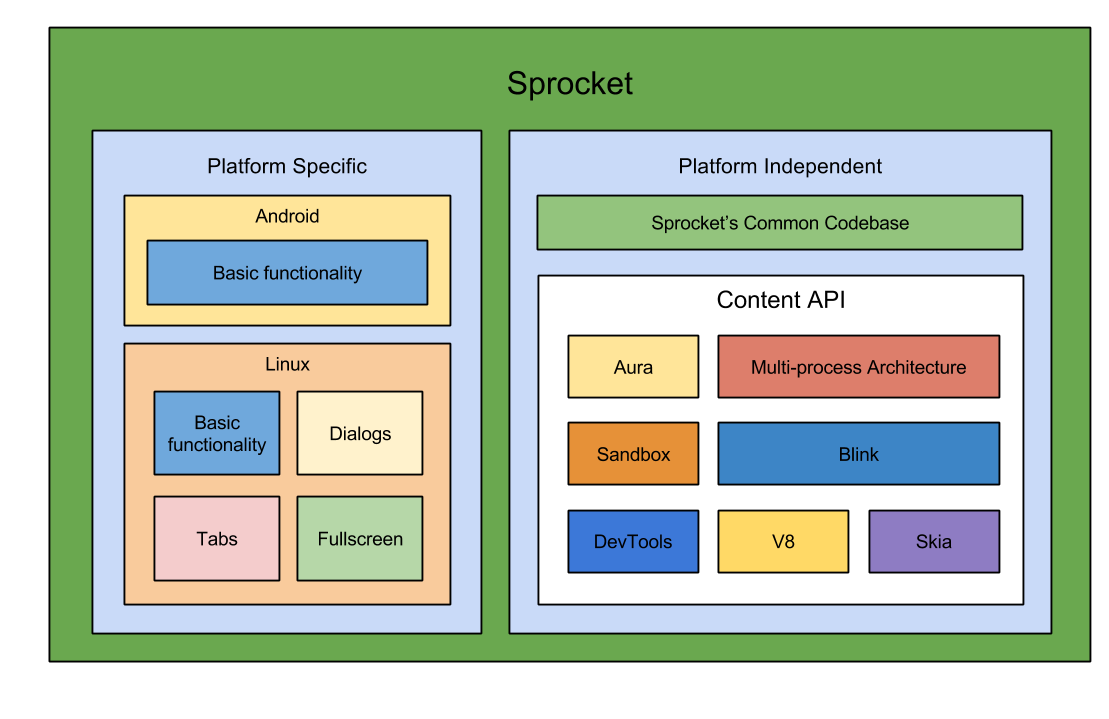
Here you can see an overview of Sprocket's architecture: High-Level, Detailed.
In this documentation we will summarize the most important details about Sprocket’s architecture. Under each heading you can read about the relevant classes which the given folder contains.
The “app” folder contains the startup dependent classes.
The Content API’s entry point is the ContentMain. This will start the whole program. We can customize the startup with implementing the ContentMainDelegate interface. Sprocket’s implementation for ContentMainDelegate is the SprocketMainDelegate class.
In Sprocket, the Android and Linux main processes are different, so we have two different paths for them.
On Linux the main() function is used as an entry point which calls the ContentMain(), passing our SprocketMainDelegate implementation.
On Android Init() will call the SetContentMainDelegate() with the SprocketMainDelegate when the shared lib has been loaded.
In the ContentMainDelegate we can customize the startup. Loading resources, checking the command line flags or expanding it, starting processes, etc.
The ‘browser’ part of the Content API is the backend for the application which handles all I/O and communication with the child processes. This also talks to the renderer to manage web pages to be painted on the screen.
See: https://www.chromium.org/developers/design-documents/multi-process-architecture
The SprocketMainDelegate creates clients, in order to customize the content in different process types. The embedder can participate in the browser logic through its SprocketContentBrowserClient class.
The browser’s main process is created in SprocketMainDelegate, and BrowserMain uses this BrowserMainRunner to Initialize, Run and Shutdown. The Android port’s logic is different from this, and will be discussed later in the Android section.
The browser startup process consists of different stages, like EarlyInitialization, MainMessageLoopStart, etc. The BrowserMainParts class contains these and here we initialize the SprocketBrowserContext and create the SprocketWebContents.
The SprocketBrowserContext class holds the context which is required for a browsing session. A typical browser application has two contexts: one for normal browsing and the other for the private/incognito session. SprocketBrowserContext stores information about the nature of the session:
... and it gives us a chance to implement various interfaces:
The URLRequest class represents the asynchronous load of a data stream from an URL and the URLRequestContext provides application-specific context for its instances. An embedder can customize the URLRequestContext objects through the URLRequestContextGetter interface: Storage, Proxy Service, Cert Verifier (ignore cert error), SSL Config Service, Host Resolver, Http Auth Handler, Cookie Store, User Agent, etc...
Sprocket uses the default classes, but we will continuously extend these with custom implementations (e.g. M1: Auth handler).
The SprocketWebContents class is our wrapper for Chromium’s WebContents. This is the core class in src/content/. It renders web content (usually HTML) in a rectangular area and it will do all the multi-process stuff behind the scenes. In this unit we handle the navigation, toggle fullscreen, open URL, etc. all the web content related operations. Each WebContents has exactly one NavigationController; each NavigationController belongs to one WebContents. The NavigationController can be obtained from GetController(), and is used to load URLs into the WebContents, to navigate backwards/forwards in the history, etc.
SprocketWindow represents one window, all the UI elements - including buttons and URL bar logic, as well as the web content area. As you might know the browser’s UI is different on Android compared to Linux (for more information check out the Android section).
On Linux we use Aura. Our View (SprocketWindowDelegateView) is a WidgetDelegate - which handles all the window related operations - with a TextfieldController - for the url bar - and a ButtonListener - for the buttons as well.
In SprocketViewsDelegateAura we set our native widget, which is the DesktopNativeWidgetAura, and the default icon and application name.
On master branch - which has tab support - the view contains two subviews: a toolbar and a tabbed pane. Sprocket’s UI layout is a simple grid with two rows. These rows are for the toolbar and the tabbed pane.
The toolbar contains the buttons (back, forward, refresh and stop) and the URL bar. We can define accelerators for the UI elements and handle button presses. It is also possible to load the typed URL from the URL bar. A good example how to control which UI element can be enabled can be seen in Sprocket.
The tabbed pane contains a scrollview and the contents view. The scrollview contains the tabs within a tab strip and a new tab button. The contents view’s child views are the webviews associated with the tabs. When a tab gets selected, the associated child view of the contents view becomes visible. Adding a tab consists of two steps: adding a tab as a child view to the tabstrip, and adding the tab’s content view as a child view to tabbed pane’s contents. The tab’s content view is a web view, which has a web content.
The context menu has the same functionality as the buttons. It can be extended, and we are planing to add the the cut, copy and paste functions to the context menu.
On core and testing branch there is no toolbar or tabbed pane. The window uses a FillLayout to stretch its content, which is the web view.
Currently Sprocket has no renderer folder, because we use the default implementation of these classes. In M2 we will extend this to show how easily you can add new features.
Sprocket specific code that runs in the renderer process could be put here. Features like auto fill, translate, etc. can be added to the content module with extension of these classes
You can find here those files which are shared between the multiple processes (i.e. browser and renderer, renderer and plugin, etc...). Here you can declare constants, switches, favicon, etc, basically everything you will need to access from all processes.
Currently Sprocket implements only the ContentClient.
In this folder you can find source codes for the Android port’s implementation. The code of an Android application is based on Java. Most of the Content API is written in C++, but to work with Android, it has Java (JNI) bindings. Fortunately with JNI we can call C++ functions and vica versa. To make this work, you need to bind the Init and RegisterJNI functions. This will be called when the shared library is loaded first.
We have defined some helper functions which will provide a bridge between the java and C++ code. It is not a hard requirement, but could be handy.
The following part requires some knowledge about Android. If you are new in this topic, we can suggest to read this basic tutorial at least. If you know the following terms it will be easy to follow us in this part of the documentation: SDK Manager, Apk, AVD, Application, Activities, Resources, Manifest, LinearLayout, EditText, Button, FrameLayout, Intent, Context.
Implemented java classes:
Although in general there is no need to subclass Application, but we will need to load our dependencies (paks) and initialize the command line. The entry point of the Content API can be found here.
Our Activity redefines the onCreate and onStart methods of the Activity Lifecycle.
On Create: the command line initialization has to be done before loading the library, because we need to pass the command line arguments first. After that, the engine tries to load the native libraries with help of the LibraryLoader. If it fails, nothing can work, so we have to kill the whole application, not just the activity. After loading the libraries we create the Manager - also create a C++ reference of it - and the Activity Window. Next, we get the startup URL and if it is not empty, we replace our default URL. And finally we can start the browser process. If the startup fails, we notify the user. If succeed, we launch the web contents, which basically creates a SprocketWindow and a SprocketWebContents. This is where Java calls a C++ function. For now, if we have an active window, we close it, and open a new one with the URL which was set before. There should not be any active window when onCreate is called, but there is a corner case (left side).
OnStart: We should have an active content view, so let’s show it.
After this, we should have the browser up, and the Window will handle all the UI interactions.